
Activating Windows ensures you can access all features and get critical software updates. Typically, this requires entering a valid product key. However, PowerShell provides administrative commands that enable automated activation using scripts. This is useful for streamlining configurations across multiple systems.
This article will walk us through leveraging PowerShell for effortless Windows activation. Subscription-based versions like Windows 11 Pro and “one-time purchase” editions can be activated using the appropriate cmdlets. We will cover syntax for standard product versions while showing output to validate successful activation.
Steps to Activate Windows via PowerShell
1. Launch PowerShell as Administrator
- Search for “PowerShell” in the Start Menu, right-click it in the results list, and select “Run as Administrator” in the context menu.
2. Determine Edition to Ensure Proper Syntax
- Run command: `(Get-WmiObject -query ‘select * from SoftwareLicensingService’).OA3xOriginalProductKey`
- This retrieves your license key to match against activation cmdlets. Note down the edition (e.g. Windows 11 Pro).
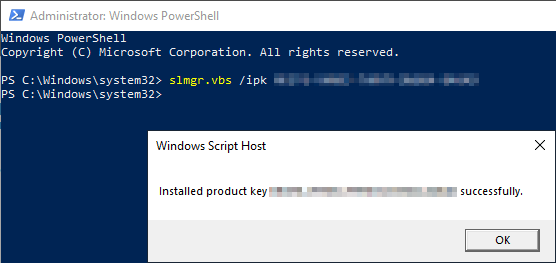
3. Run Appropriate Activation Cmdlet for Your Edition
For example, run for Windows 11 Pro: `slmgr /ipk W269N-WFGWX-YVC9B-4J6C9-T83GX` – Or for Windows 10 Home: `slmgr /ipk TX9XD-98N7V-6WMQ6-BX7FG-H8Q99`
4. Check Activation Status
- Run command: `slmgr /dli`
- Verify return code is 0 for successful activation without errors or a retail/subscription license type.
Using built-in PowerShell cmdlets allows streamlined Windows activation without the headaches of product keys. Determine your edition, run the associated `slmgr /ipk` command with the license key, and validate through `slmgr /dli`.
Automate across your infrastructure with scripts for quick results! Reach out with any other questions.
Install a new Windows license key.
It would be best if you had a valid product key for your edition of Windows. This is typically located on the sticker attached to your computer or in the email receipt for digital purchases.
- Insert your key by running the command: `slmgr /ipk xxxxx-xxxxx-xxxxx-xxxxx-xxxxx`
- Replace the x’s with your actual 25-character product key with dashes For example, for Windows Server 2022: `slmgr /ipk M7XTQ-FN8P6-TTKYV-9D4CC-J462D`
- This installs the key into your machine’s registry but does not yet activate Windows. Activation is done in the next step after verifying the key is set.
Important: Make sure this matches the edition you found using `Get-WmiObject` in Step 1 so it activates properly later.
With a new key – activate Windows via PowerShell.
You can send the activation immediately after the above command. With “slmgr /ato“ Windows activates the product key and informs you of the result.
You can skip this step if you have an existing internet connection. Windows activates itself automatically after a short time (or a restart) without any further action. Exceptions confirm the rule here, too, of course